Building a CAPEv2 Automated Malware Analysis Lab on Proxmox VE
This blog post provides a complete technical guide for deploying a self-hosted CAPEv2 malware analysis sandbox on Proxmox VE infrastructure, including network segmentation, Windows 7/10/11 guest VM setup, and integration with existing homelab infrastructure.
Introduction
I began experimenting with local malware analysis in 2017 using Cuckoo Sandbox, an open-source automated analysis framework. Even though the original project is no longer maintained, the CAPEv2 fork continues its development with modern enhancements including Python 3 support.
Having a local sandbox environment provides significant advantages over public alternatives. Even though public sandboxes offer convenience, they usually log and retain all submitted samples, creating potential data exposure risks for sensitive or proprietary files. A self-hosted solution ensures complete control over sample data and, honestly, I just enjoy building these systems in my homelab.
This setup complements my existing infrastructure nicely. I regularly feed samples captured by my locally-hosted T-Pot honeypot into the sandbox for analysis. As my homelab continues to evolve, now seems like the perfect time to document this CAPEv2 implementation. Plus, if I’m being transparent, this is definitely a more enjoyable way to spend time than studying for my MS SC-300 certification (sorry Microsoft).
I relied on CAPEv2’s official documentation, their GitHub repository, online research, and Claude AI for troubleshooting throughout this process.
NOTE: If you have been following my homelab journey, you will notice I have migrated from ESXi/vSphere to (Proxmox)[https://proxmox.com/en/]. This change was driven by Broadcom’s recent VMware licensing updates, which significantly increased costs for homelab users. Previously, I maintained access to the VMware ecosystem through a VMUG membership at $200 annually, but this program has been discontinued. Rather than continue running without security updates, I decided to transition to a new platform.
I selected Proxmox due to my prior experience with it and its robust community support. That being said, I am watching the development of Vates’ XCP-ng (Citrix Xen fork) and Xen Orchestra appliance (particularly the upcoming version 6 release). Their new GUI on version 6 looks very similar to what I am used to in the VMware world.
The migration was straightforward: I replaced my ESXi hosts (esxi-0, esxi-1, esxi-2, esxi-3) with Proxmox VE nodes (pve-0, pve-1, pve-2, pve-3), leveraging Proxmox’s built-in ESXi migration functionality to maintain virtually the same infrastructure configuration.
Overview
Here is a high-level logical network topology diagram showing how everything interact:

| VLAN | Purpose | Internet Access |
|---|---|---|
| VLAN 1: Home | Management workstation | Yes |
| VLAN 101: VM | NGINX Proxy Manager (NPM)/reverse proxy | Yes |
| VLAN 104: VPN | CAPE server | Yes |
| VLAN 100: Management | Proxmox VE (PVE-0) | Yes |
| VLAN 111: CAPE | Windows 7, Windows 10, and Windows 11 CAPE analysis VMs | No |
Network Flow Summary
- Management -> NPM My management workstation (a MacBook) connects over HTTPS (TCP 443) to the reverse proxy.
- NPM -> CAPE Server The reverse proxy proxies web requests to the CAPE server in the VPN VLAN.
- CAPE <-> PVE 0 The CAPE server uses the Proxmoxer library to connect to my Proxmox VE host over HTTP (TCP 8006) for managing the analysis VMs such as powering them on, creating snapshots, and reverting to clean states.
- PVE 0 <-> Analysis VMs Proxmox VE manages the Windows analysis VMs through QEMU at the hypervisor level for power operations and snapshot management.
- CAPE Agent <-> Analysis VMs The Python-based CAPE agent runs inside each Windows VM, listening on port 8000 (HTTP), reporting back to the CAPE server.
This segmented/VLAN-based design ensures that:
- Trusted management traffic stays on secured management networks.
- Untrusted analysis VMs remain in their own VLAN with no direct internet access or access to any other VLANs to contain malicious samples.
- All communication between CAPE and Proxmox VE happens over encrypted HTTPS channels.
Prerequisites
This guide assumes you already have a fully functional Proxmox VE environment with at least one Proxmox VE host.
Prepare the following VMs with similar specifications:
CAPE Server
- OS: Ubuntu Server 24.04 LTS
- vCPUs: 4
- Memory: 8 GB
- Disk: 100 GB
- Network adapter 1 connected to your VPN VLAN (101) (i.e., 172.16.104.67)
- Network adapter 2 connected to your CAPE VLAN (111) (i.e., 172.16.111.254)
NOTE: Ensure that this server can communicate with your Proxmox VE host over HTTPS/8006 in your management VLAN.
NOTE: Make sure to set the CPU type to “host” for MongoDB compatibility. I ran into issues with the installation of MongoDB using the default CPU type.
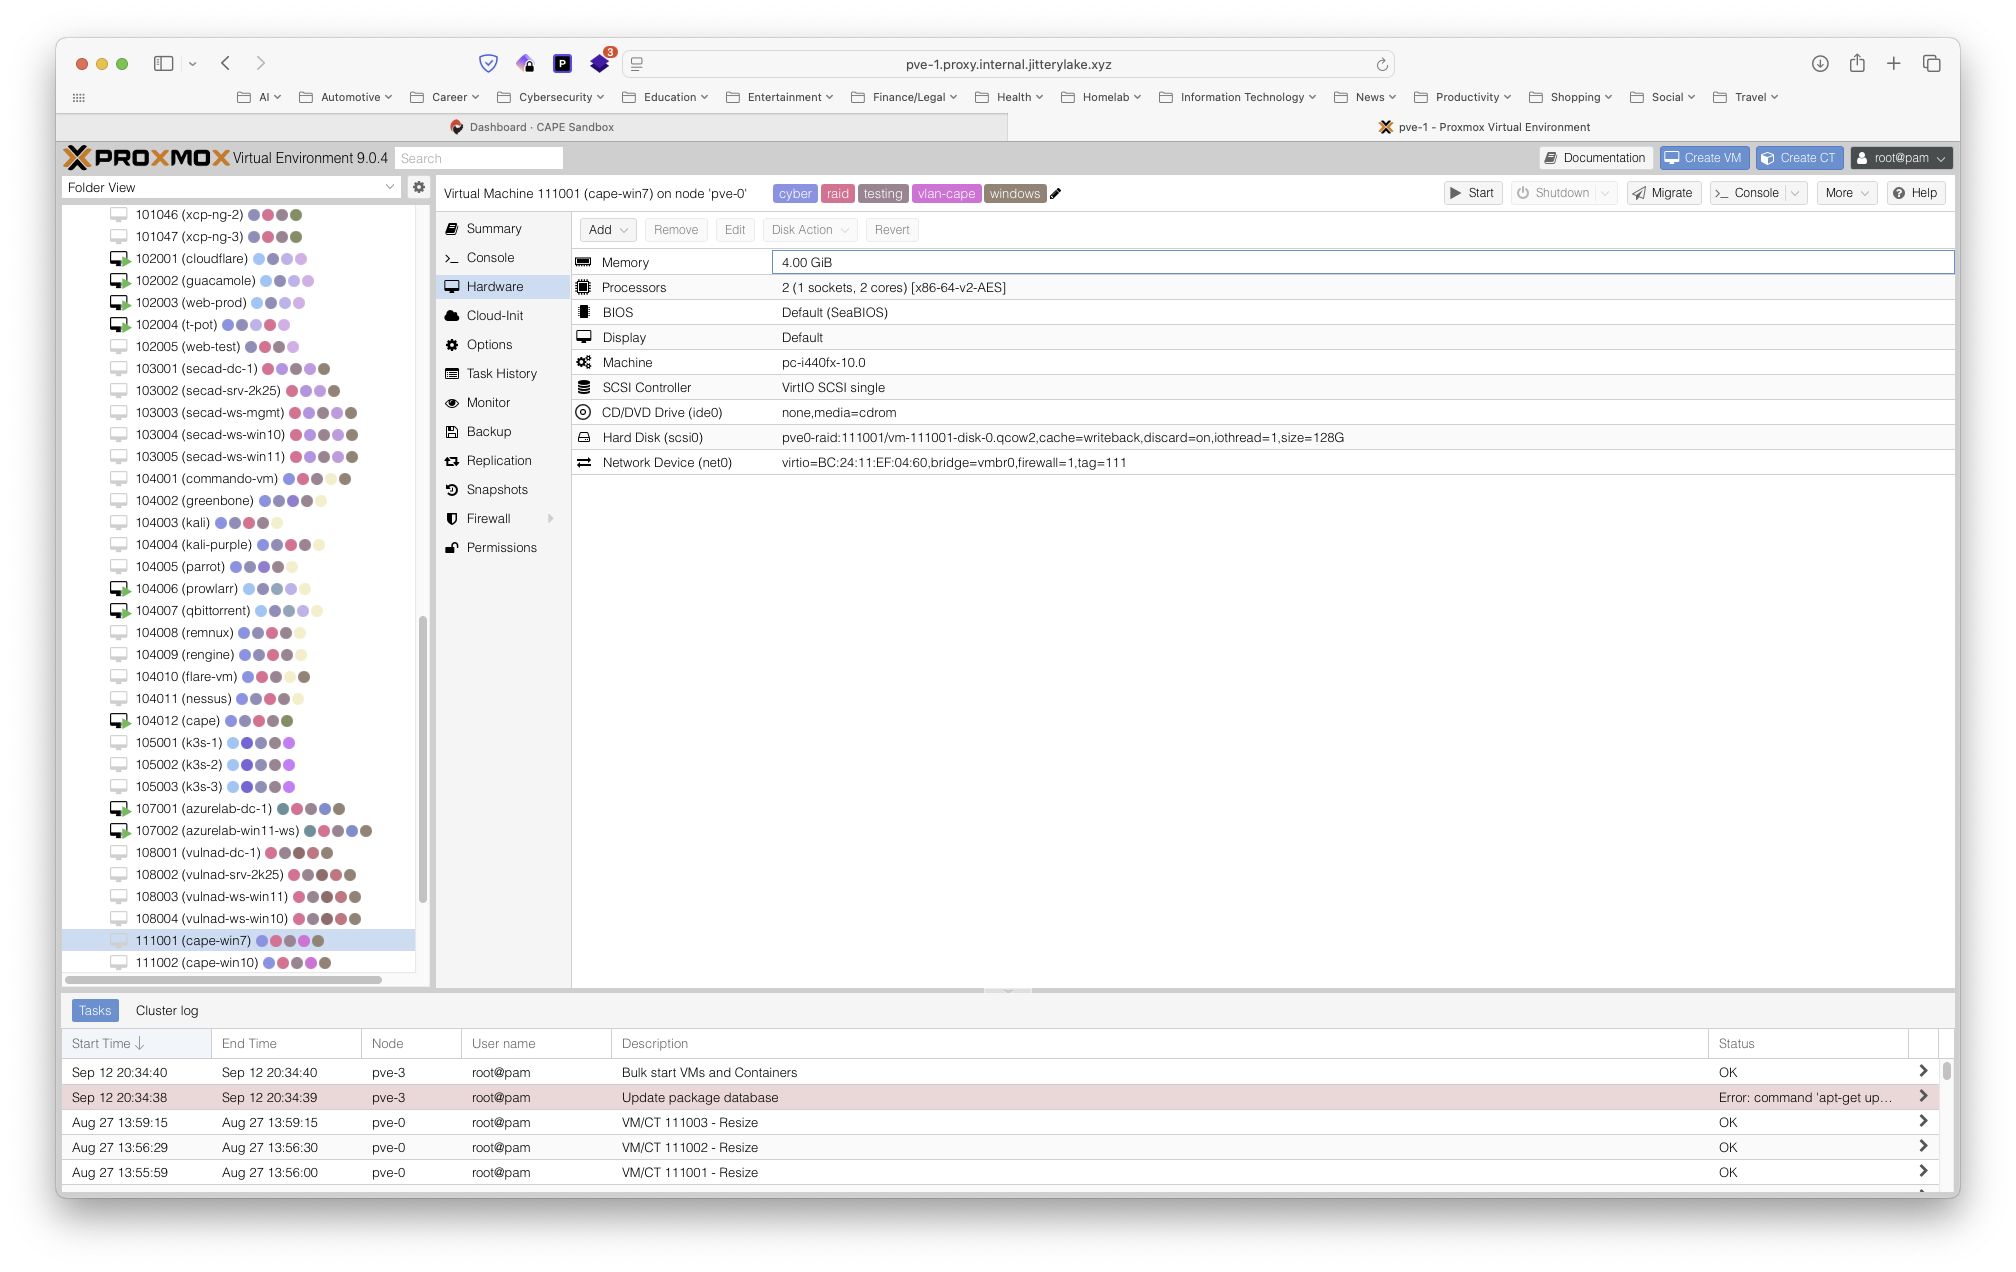
Windows 7 Analysis VM
- vCPUs: 2
- Memory: 4 GB
- Disk: 128 GB
- Network adapter 1 connected to your CAPE VLAN (111) (i.e., 172.16.111.101)
Windows 10 Analysis VM
- vCPUs: 2
- Memory: 4 GB
- Disk: 128 GB
- Network adapter 1 connected to your CAPE VLAN (111) (i.e., 172.16.111.102

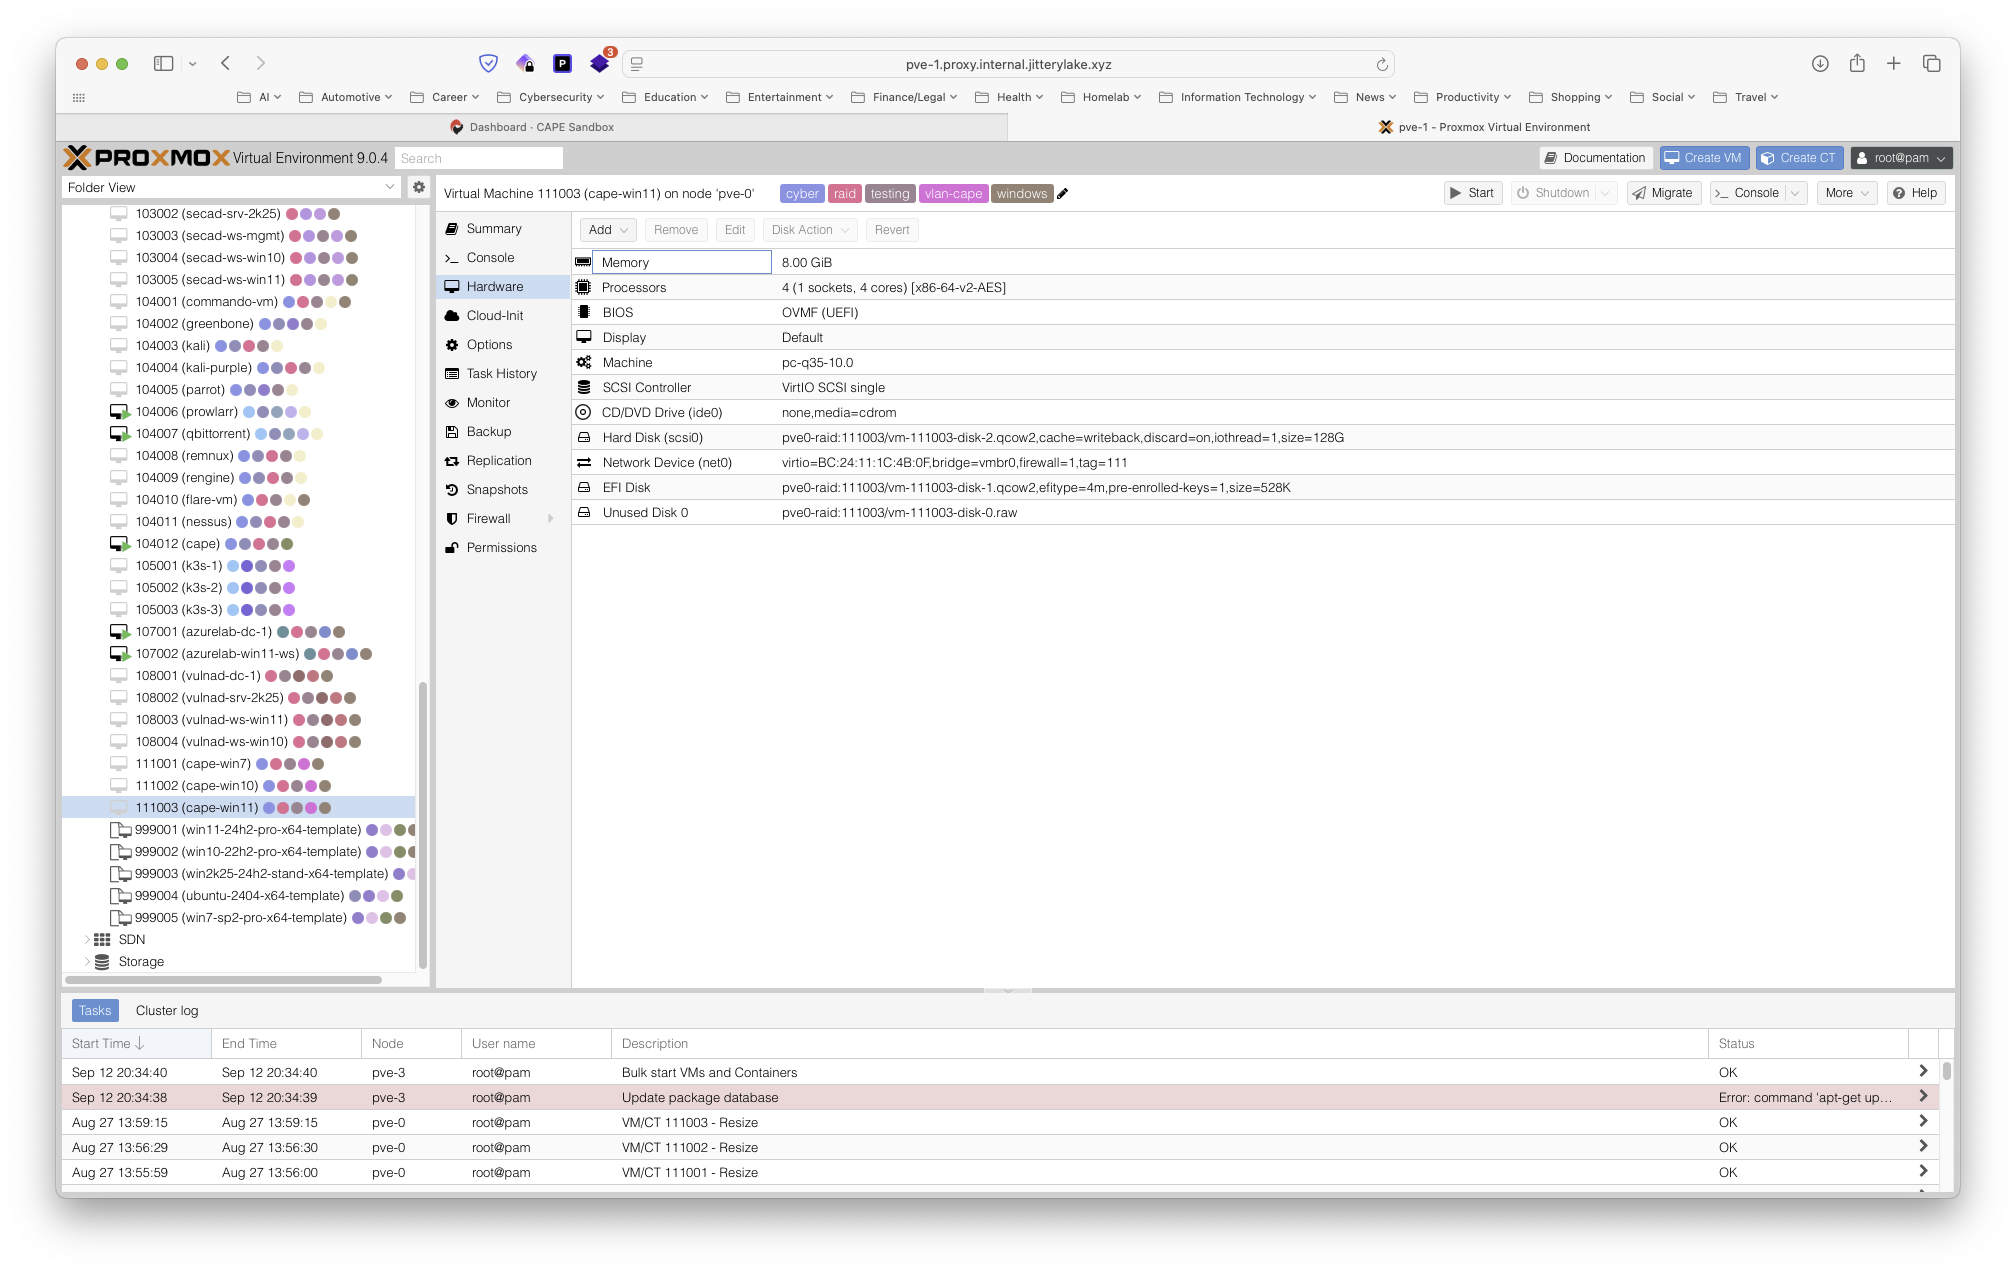
Windows 11 Analysis VM
- vCPUs: 4
- Memory: 8 GB
- Disk: 128 GB
- Network adapter 1 connected to your CAPE VLAN (111) (i.e. 172.16.111.103)
NOTE: I have set all of these IPs via DHCP reservations on my UniFi Dream Machine Pro.
Server Preparation
First, set the correct timezone and make sure your OS is fully up-to-date and clean:
1
2
3
4
5
6
sudo timedatectl set-timezone America/New_York

sudo apt update
sudo apt full-upgrade
sudo apt autoremove
sudo apt clean
Next, configure your network interface (ens224) to use DHCP via Netplan. Open the Netplan file:
1
sudo nano /etc/netplan/50-cloud-init.yaml
Add or adjust the ens224 (or whatever your second interface is called) block so it reads:
1
2
3
...
ens224:
  dhcp4: true
Then test and apply your network changes:
1
2
sudo netplan try
sudo netplan apply
Next, bring the interface up:
1
sudo ip link set ens224 up
Finally, reboot to ensure everything comes up correctly:
1
sudo reboot

NOTE: Once the system is back online, I recommend you take a VM snapshot before proceeding with the CAPE installation. This provides a clean rollback point in case anything goes wrong downstream (which most definitely happened, in my case).
Proxmox VE Roles and Permissions
We now need to set up a user, set up a role, and assign that role to our analysis VMs in Proxmox VE.
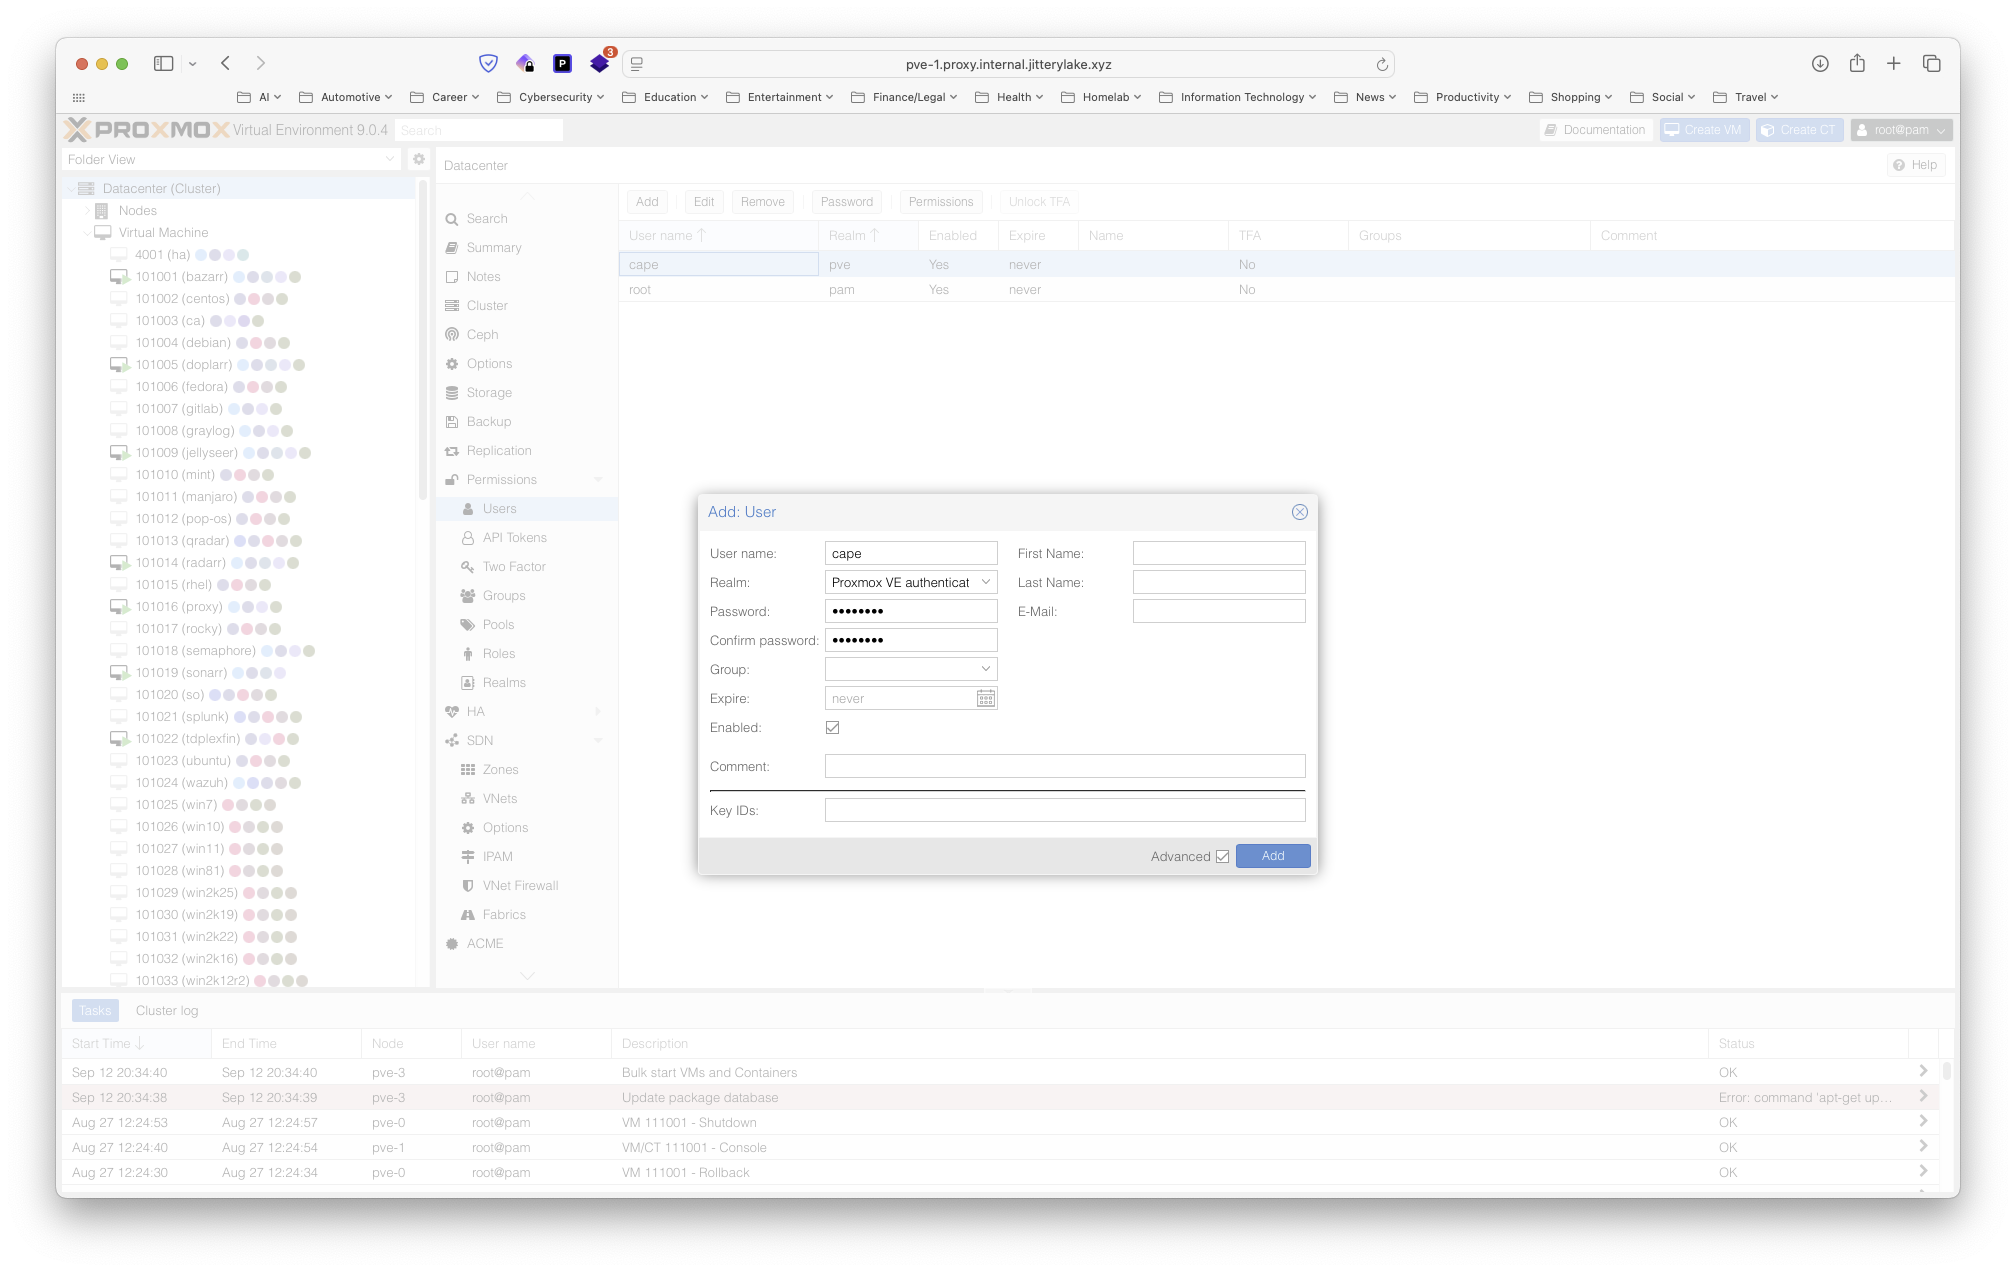
- First, navigate to Datacenter > Permissions > Users and add a user. I called mine cape. Make sure to select the Realm as Proxmox VE authentication. Enter a password and create.
- Next, Navigate to Datacenter > Permissions > Roles and create the role, giving only the permissions we need to this user. I called mine Cape and added the following privileges: Sys.Audit, VM.Audit, VM.PowerMgmt, VM.Snapshot, VM.Snapshot.Rollback. These privileges are working for me so far.

- Finally, navigate to Datacenter > Permissions and assign this user to this role on the specific VMs we want like so:
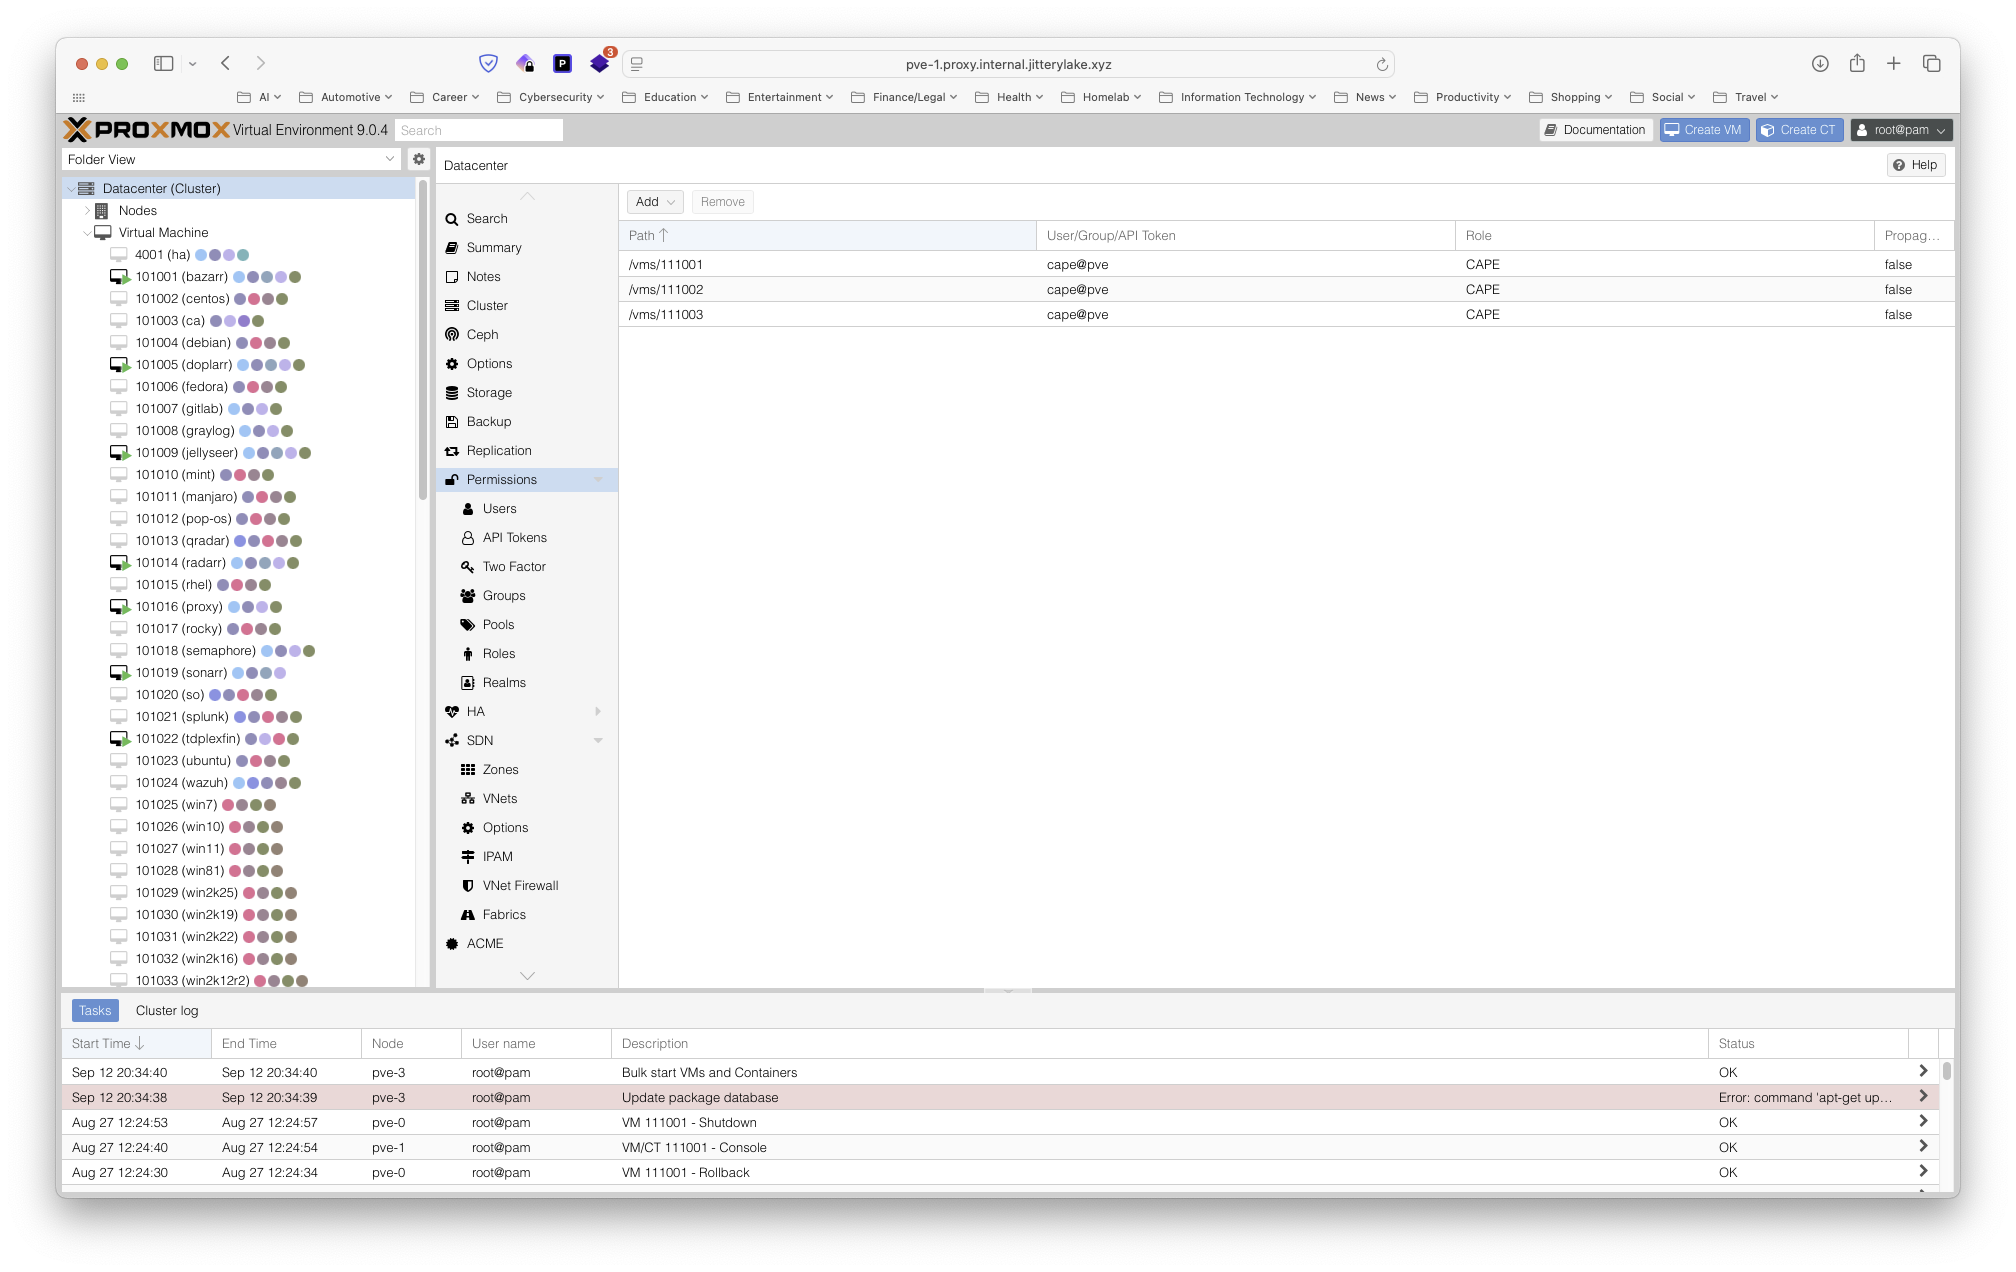 That should be all we need from an IAM perspective.
CAPE Installation
Next, we grab the official CAPEv2 installer script, make it executable, run the full install and reboot to start all services cleanly.
1
2
3
4
wget https://raw.githubusercontent.com/kevoreilly/CAPEv2/master/installer/cape2.sh
chmod +x cape2.sh
sudo ./cape2.sh all cape | tee cape.log
sudo reboot
Post Installation
First, I installed all additional prerequisites as per the documentation:
1
2
cd /opt/CAPEv2/
poetry install
Next, I installed the optional components as per the documentation (and the components listed in the logs when starting the services):
1
2
3
sudo -u cape poetry run pip install -r extra/optional_dependencies.txt
sudo -u cape poetry run pip install -U git+https://github.com/DissectMalware/batch_deobfuscator
sudo -u cape poetry run pip install -U git+https://github.com/CAPESandbox/httpreplay
Finally, I installed Proxmoxer:
1
sudo -u cape /etc/poetry/bin/poetry add proxmoxer
NOTE: Each of these components above need to be installed via poetry from the /opt/CAPEv2 directory. CAPEv2 may not be able to see/use them if they are installed any other way or in any other location.
CAPEv2 Configuration Files
At this point, I configured the configuration files for CAPEv2 located in /opt/CAPEv2/conf.

I will only list the items I changed from their default settings:
auxiliary.conf
1
2
[sniffer]
interface = ens19
The above sets our tcpdump sniffer to the correct network interface on our CAPE server, the interface connected to the CAPE VLAN (not your VM/internet interface).
cuckoo.conf
1
2
3
4
5
[cuckoo]
machinery = proxmox

[resultserver]
ip = 172.16.111.254
The above changes set our machinery module to Proxmox and set the result server IP address to the IP address of our CAPE server’s network interface connected to our CAPE VLAN.
processing.conf
1
2
[virustotal]
key = <VTAPIKEY>
Since I was seeing errors in the logs when CAPE tried to connect to VirusTotal using the provided VT API key, I created a free account and API key in VT and replaced it here.
proxmox.conf
1
2
3
4
5
6
7
8
9
10
11
12
13
14
15
16
17
18
19
20
21
22
23
24
25
26
27
[proxmox]
hostname = cape.internal.jitterylake.xyz
username = cape@pve
password = <PVEPASSWORD>
interface = ens19
machines = cape-win7,cape-win10,cape-win11

[cape-win7]
label = cape-win7
platform = windows
ip = 172.16.111.101
arch = x64
snapshot = Baseline

[cape-win10]
label = cape-win10
platform = windows
ip = 172.16.111.102
arch = x64
snapshot = Baseline

[cape-win11]
label = cape-win11
platform = windows
ip = 172.16.111.103
arch = x64
snapshot = Baseline
Here, I set up the connection to the Proxmox VE server using the credentials I created previously, adhering to the principle of least privilege. I also set up each guest VM we will set up later so that CAPE knows what VMs it has access to and can detonate malware on.
NOTE: Make sure to set the interface here to your CAPE VLAN interface on your CAPE server, not the Proxmox VE node. I made that mistake the first time and spent some time troubleshooting.
routing.conf
1
2
[routing]
internet = eth0
Here, I just made sure to set the internet variable to the network interface for my VPN VLAN since I want Internet traffic to flow via my VPN, not the CAPE VLAN I set up with no Internet access.
After you finish updating all of the configuration files, make sure to either restart all CAPE services or just restart the CAPE VM and check the logs located in /opt/CAPEv2/log or via journalctl to make sure there are no errors before continuing.
Windows 7 Guest Setup
- Install Windows 7 via an ISO obtained from the Internet. There are multiple places where you can obtain such ISOs. It is up to you to find the ISO. I personally chose an x64 ISO with SP1.
- When you install on Proxmox, you need to make sure to follow Proxmox’s instructions on how to install the Proxmox drivers at boot. More on that here: https://pve.proxmox.com/wiki/Windows_7_guest_best_practices. The version of the virtio ISO I used that worked is 0.1.173. Currently, it can be found here: https://fedorapeople.org/groups/virt/virtio-win/direct-downloads/archive-virtio/virtio-win-0.1.173-9/virtio-win-0.1.173.iso
- Make sure not to name your user or computer anything obvious to malware analysis. In my case, I used my favorite fictional character’s name: Elliot Alderson.
- I recommend not putting a password on this account for quicker login from boot. This does not really affect how the sandbox works, but it does make it quicker to do things after reboots.
- Once installed and logged in, I then installed MS Office 2010 x86. Again, you can find this ISO on the internet. Make sure to use x86, not x64, as CAPEv2 officially supports x86 Office applications.
- At this point, I fully updated the Windows 7 VM. This is a bit tricky. Because of how old the ISO was, I first needed to manually install KB3138612 and reboot. Then I was able to continue using Windows Update to install updates and rebooting until there were no more to install.
- NOTE: this process may change in the future when Microsoft eventually takes down the infrastructure used to update Windows 7. Once that happens, and if you still would like to update, I encourage you to take a look at https://legacyupdate.net (pretty cool project).
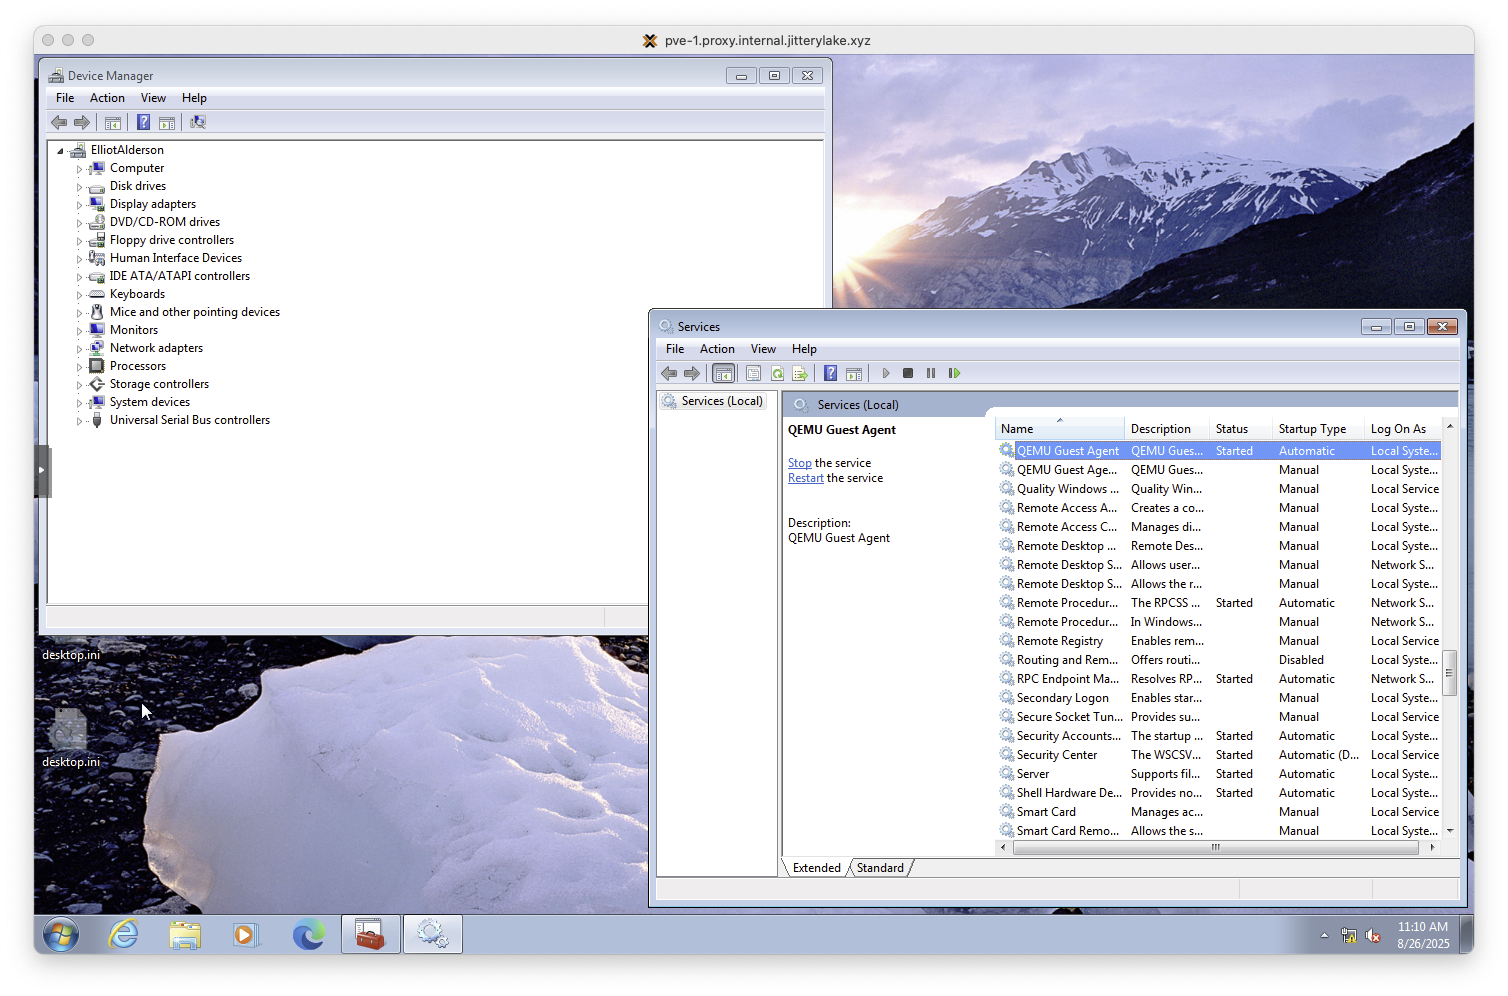
- I then installed the Qemu Agent and all the drivers that were unknown in the Device Manager using the virtio ISO image you should have used to install Windows 7 above.
- I then installed a couple of purposely outdated applications, specifically:
- Adobe Reader 11008 x86
- JRE 8u51 x86
- Then, I installed the latest version of x32 Python that still supported Windows 7, 3.8.6.
- Then, I upgraded PIP and installed Python Pillow, for screenshot functionality:
1
2
python -m pip install --upgrade pip
python -m pip install Pillow==9.5.0
- Then, I copied over the CAPE (Cuckoo) agent from
/opt/CAPEv2/agent/agent.pyon the CAPE server to the startup directory in the Windows 7 host here: C:\ProgramData\Microsoft\Windows\Start Menu\Programs\StartUp- NOTE: make sure to rename the extension from
.pyto.pyw
- NOTE: make sure to rename the extension from
- I then disabled the Firewall, UAC and ran the disable_win7noise.bat script located here on the CAPE server: /opt/CAPEv2/installer/disable_win7noise.bat.
- Finally, I rebooted the VM and made sure that the agent was running correctly and was accessible by the CAPE server by running the following command on the CAPE server. You should see similar output:
1 2
skneppel@cape:~/CAPE$ curl 172.16.111.101:8000 {"message": "CAPE Agent!", "version": "0.20", "features": ["execpy", "execute", "pinning", "logs", "largefile", "unicodepath", "mutex", "browser_extension"], "is_user_admin": true}- NOTE: Also ensure that you see “is_user_admin” is set to “true.” The agent will not work correctly if it is not running as admin.
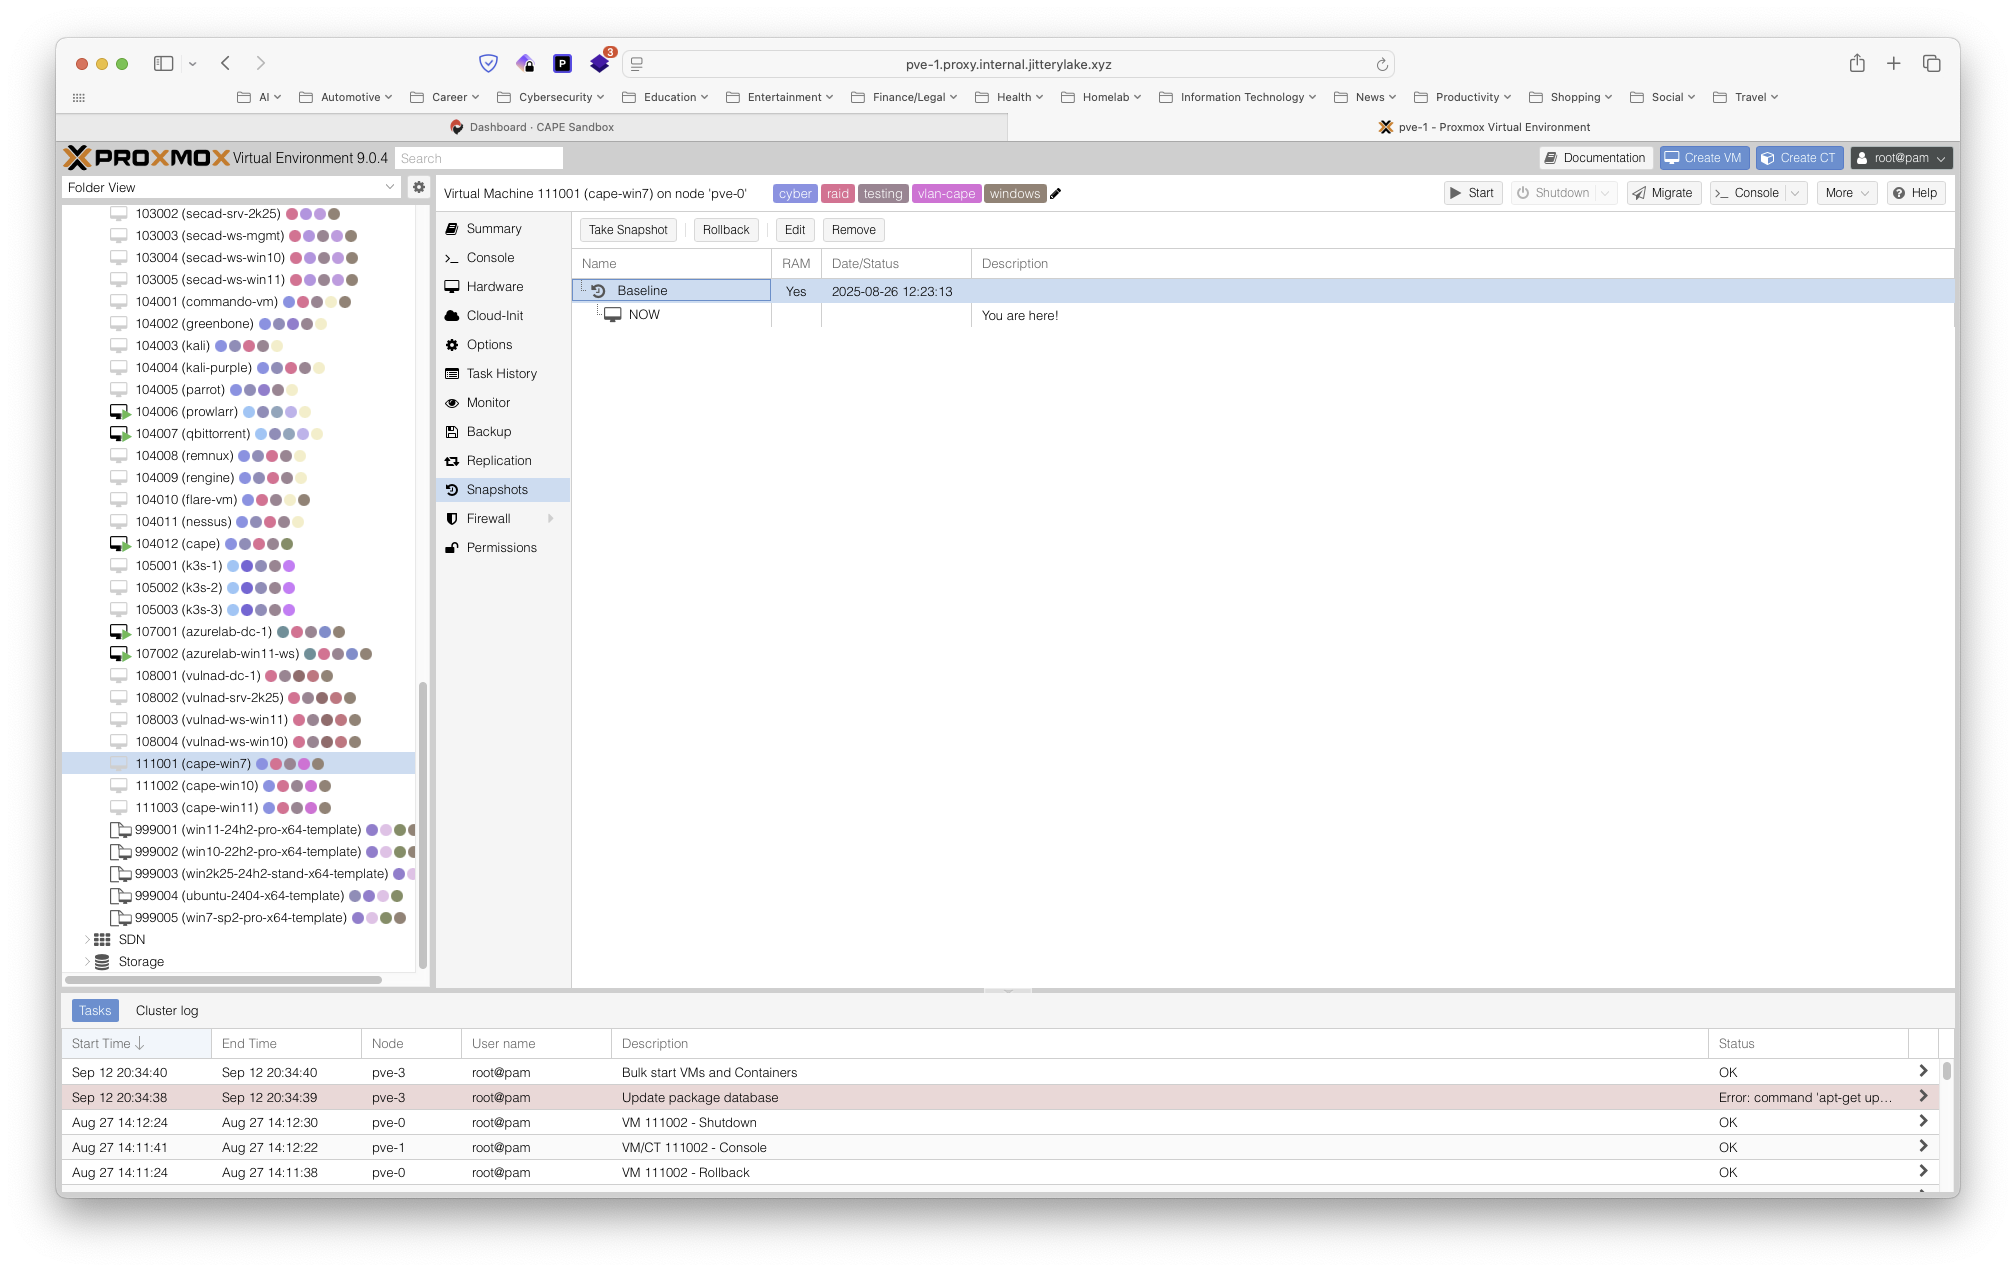
- Finally, take a snapshot of the VM running with RAM included. I called mine “Baseline.”
Windows 10/11 Guest Setup
The instructions for Windows 10/11 are almost the exact same, and also very similar to Windows 7. Below are the notable changes:
- Use the latest VirtIO ISO for these, since Windows 10/11 are both officially supported.
- For Windows 11, you will need to create a TPM for initial installation, but then delete it later for snapshots to work. In my testing, deleting the TPM does not affect booting the VM. I believe the TPM is mainly used to store the BitLocker keys if we encrypt the drive, which we are not.
- There is no need to install KB3138612 to get Windows Update to work. Just update it like you normally would.
- Instead of Microsoft Office 2010, I chose install Office 2016 x86. This is optional, but I wanted a wider variety of versions to detonate malware against.
- Make sure to use the latest version of x86 Python 3 that is available (version 3.12.9, I believe).
- Before you download the CAPE agent and other software, I recommend disabling Windows Defender, Firewall, and UAC. Disabling Windows Defender can be tricky on Windows 10/11:
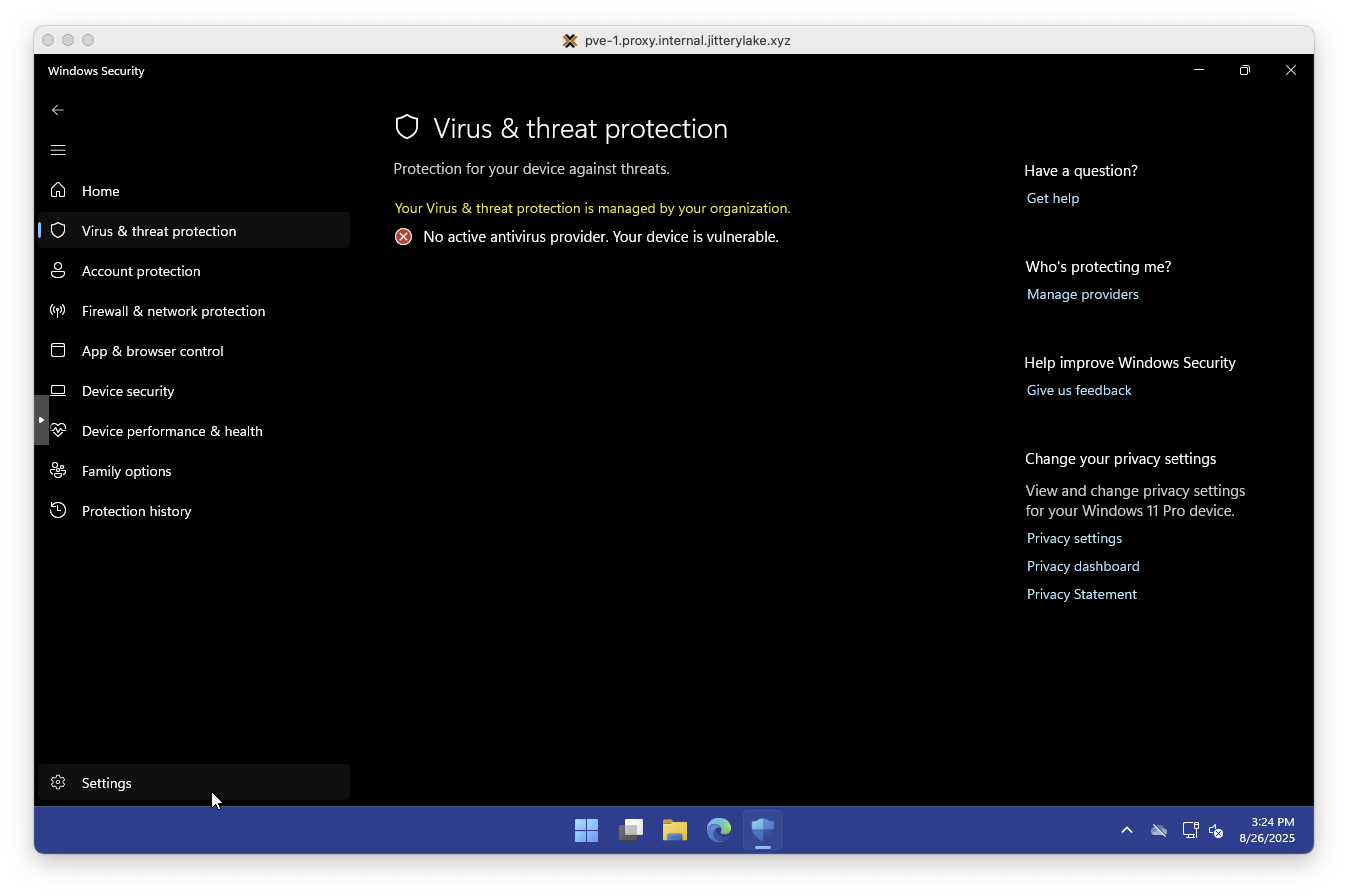
- First, disable Tamper Protection via the Windows Security app by opening it up and navigating to Virus & threat protection > Virus & threat protection settings > Manage settings and switching Tamper Protection to Off then reboot.
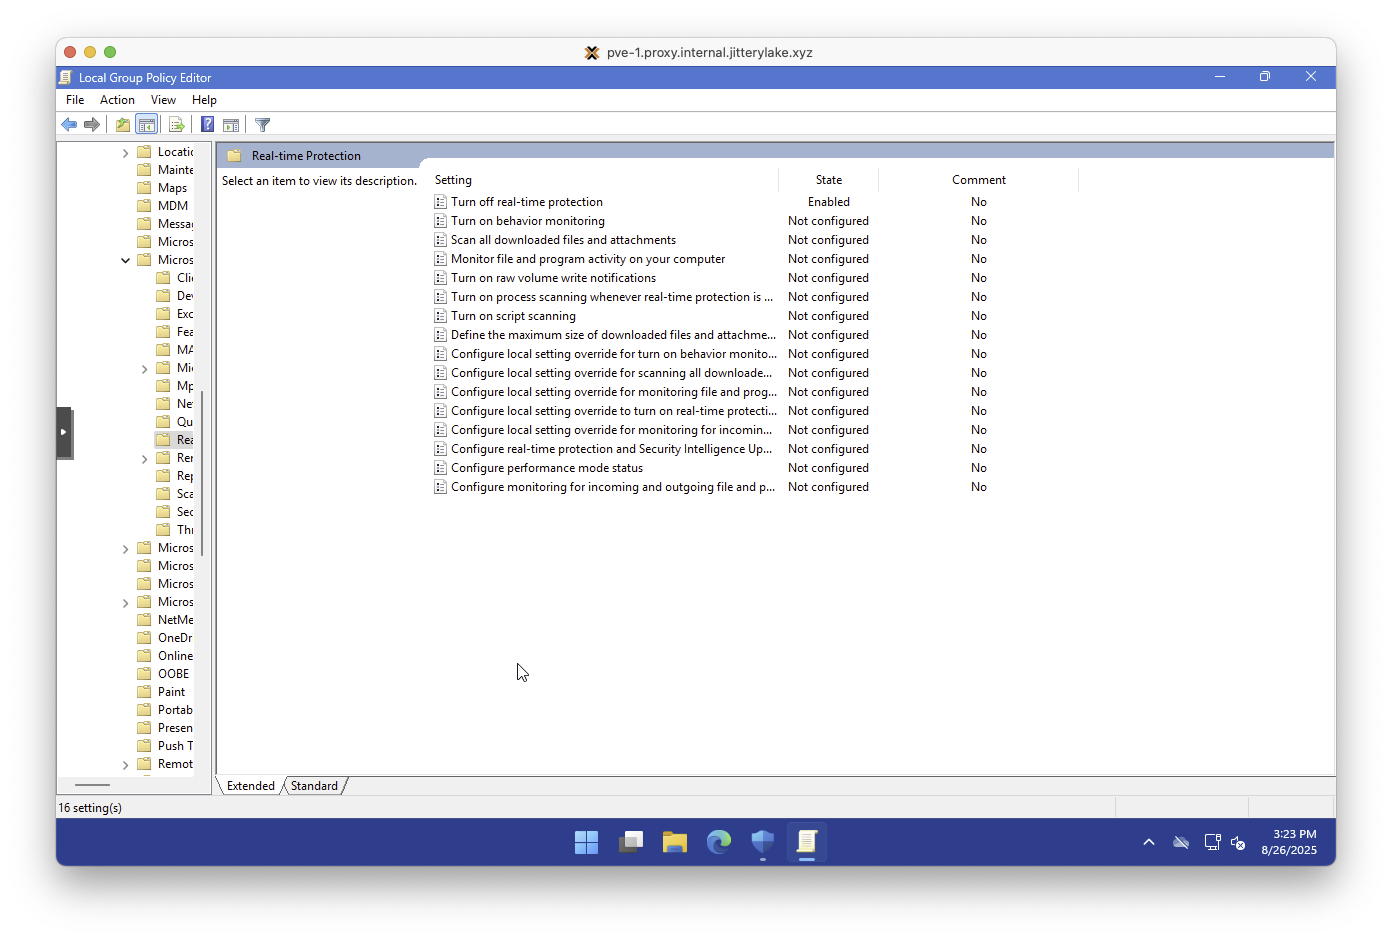
- Next, open up Group Policy Editor, navigate to Computer Configuration > Administrative Templates > Windows Components > Microsoft Defender Antivirus > Real-time Protection and enable Turn off real-time protection.
- Then, navigate to Computer Configuration > Administrative Templates > Windows Components > Microsoft Defender Antivirus and enable Turn off Microsoft Defender Antivirus.
- Finally, reboot. After you complete these steps, Windows Defender should be disabled.
- NOTE: Make sure you disable Tamper Protection first before rebooting and disabling Windows Defender via local GPO. Otherwise, it will just turn itself back on after a reboot.
- Once all that has been disabled, download Adobe and Java and install like above for Windows 7.
- Finally, instead of copying the
agent.pywfile to the Startup folder, you need to create a scheduled task to start it at boot. Follow the official instructions on how to set this up properly.
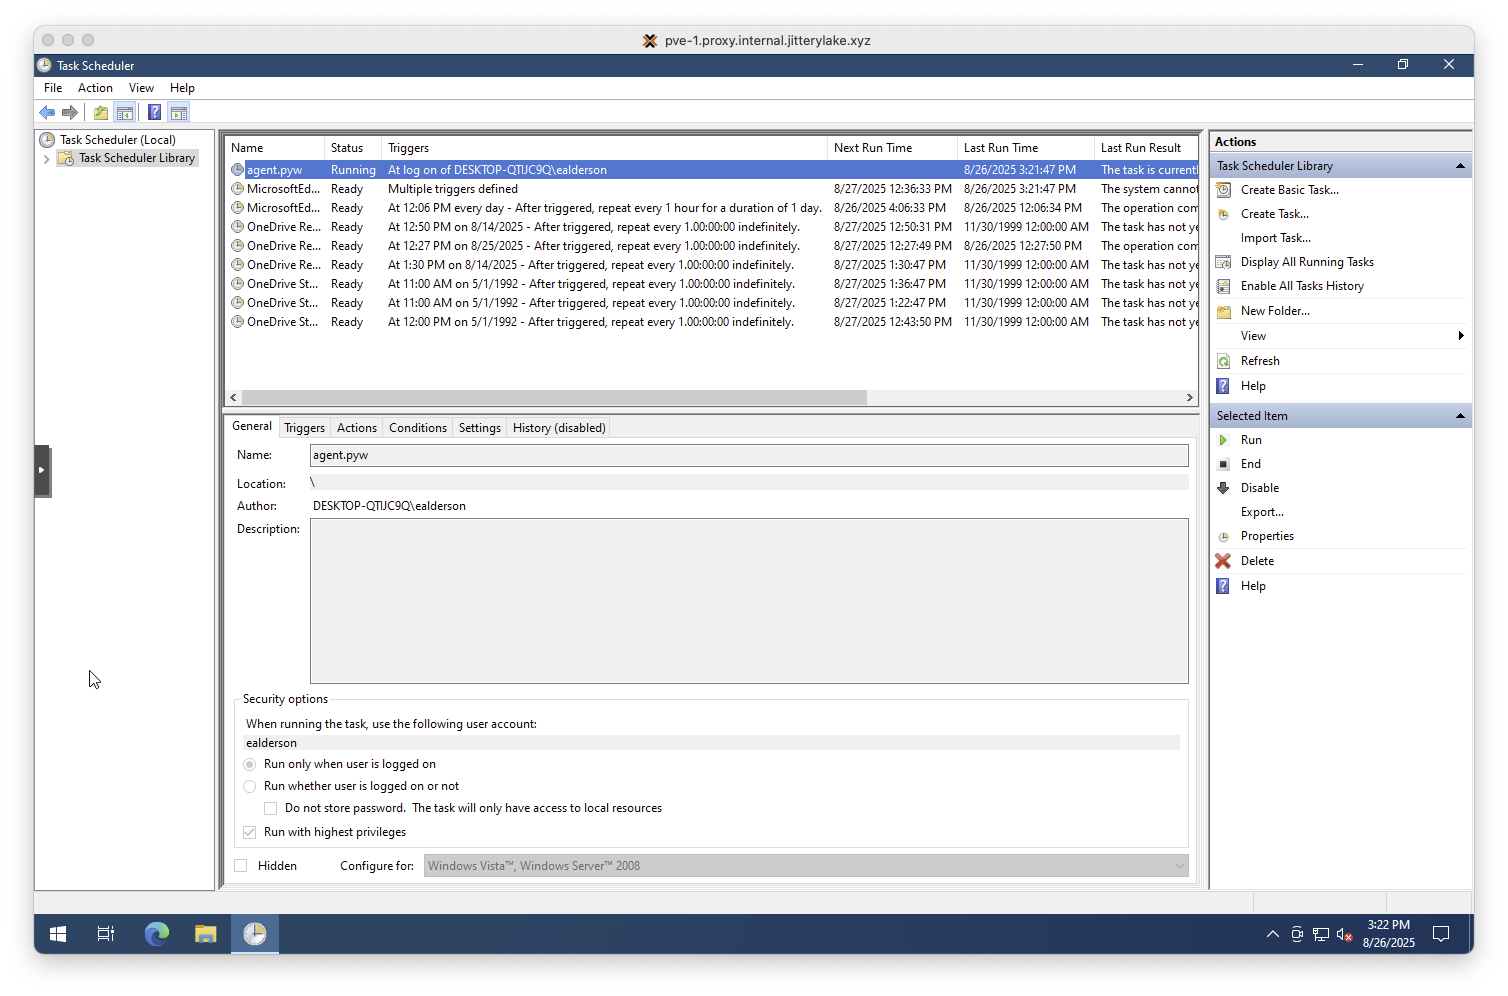 - NOTE: Make sure to set the task to “Run only when the user is logged in” and “Run with highest privileges.” I made the mistake of setting this to “Run whether the user is logged on or not” and ran into screenshotting issues related to changes Microsoft made to how Windows sessions are handled in Windows 10 and above.
Testing and Validation
At this point, after setting up the guest VMs and the server, you should be ready to test. This can be done by simply navigating to the IP (or DNS entry) created for the CAPE server (assuming you have the proper firewall rules in place to allow your management device access to the CAPE server) on port 8000 like so:
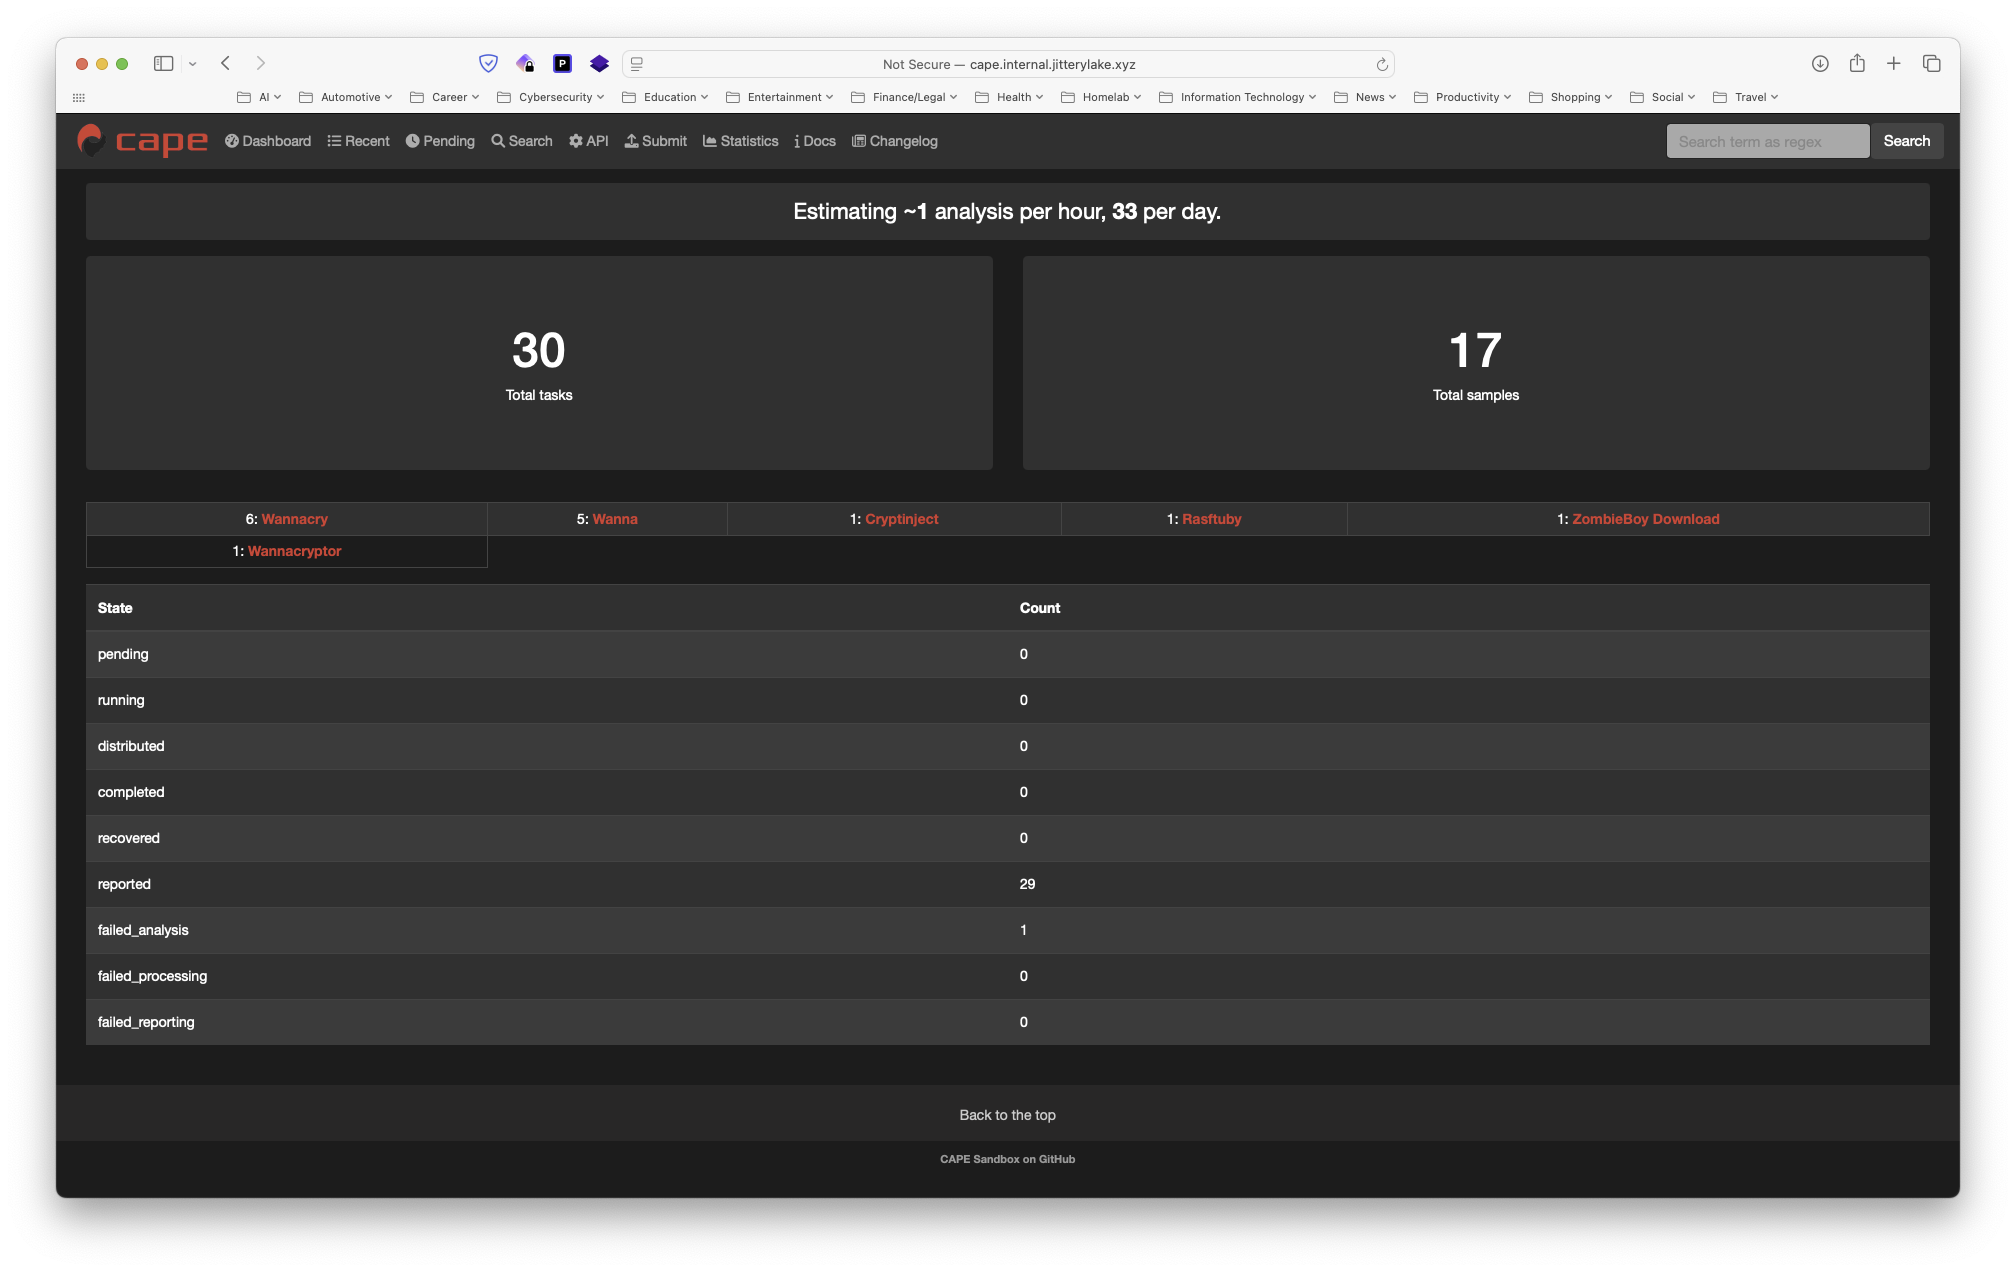 Then, navigate to Submit and upload a test sample. I personally used Pafish for testing before moving on to an actual malware sample from my honeypot. After you run it, make sure that there are no obvious errors and that the telemetry is picked up in the report as well as screenshots. Once it is completed, you should see a report similar to this:

 Once you confirm the sandbox is working as expected, you can upload an actual malware sample and see what it does. Personally, my sandbox is mainly receiving WannaCry variants. Here is an example of what that may look like in a report:

 And that’s it! Assuming you followed the above instructions (and nothing has changed since the writing of this blog post) you should have a fully functional distributed malware analysis environment! You will have the ability to detonate malware in Windows 7, 10, or 11. You will also be able to allow Internet access or not. You can even interact with the VM (via the Proxmox VE console) if you want to play around with the malware directly on the VM while the analysis is running.
Conclusion and Next Steps
What We Built
In this guide, we successfully deployed a CAPEv2 malware analysis environment on Proxmox VE infrastructure. We set up a distributed malware analysis sandbox capable of detonating samples across Windows 7, 10, and 11 VMs while maintaining complete control over our data and infrastructure. The setup includes proper network segmentation, automated VM management through Proxmoxer, and integration with existing honeypot infrastructure for continuous sample collection.
Troubleshooting Resources
If you run into issues during your deployment, I recommend checking the following log sources for additional troubleshooting information:
- System logs: Use
journalctl -u cape-*to check the status of CAPE services - CAPE application logs: Review logs in
/opt/CAPEv2/logs/for detailed application-level errors - Agent communication: Monitor agent logs through the CAPE web interface, or check
/opt/CAPEv2/storage/for analysis-specific logs and artifacts These log sources have been invaluable in diagnosing configuration issues and understanding what’s happening under the hood.
 For additional support beyond local logs, leverage online resources like CAPEv2’s official documentation, the GitHub issues section for known problems and solutions, general web searches for specific error messages, and AI assistants like Claude.ai for configuration guidance and troubleshooting steps.
Next Steps
Moving forward, I have a few items on my technical roadmap:
First, I need to resolve an issue with my NPM reverse proxy where malware submissions hang when submitted through my reverse proxy setup, though direct connections to the CAPE server work fine. This suggests there is a timeout or connection handling issue in my proxy configuration that needs investigation.
I am also interested in exploring other open-source, locally-hosted automated malware sandboxes like DRAKVUF Sandbox as an alternative analysis platform. Setting up DRAKVUF in my lab environment would allow me to compare its capabilities with CAPEv2 and determine which better fits my analysis workflow and technical requirements.
Finally, now that this lab deployment is complete, it is time to get back to studying for my Microsoft SC-300 certification exam, no more procrastinating with fun homelab projects!
If you have any questions or feedback about this guide, feel free to reach out to me on LinkedIn or via email.